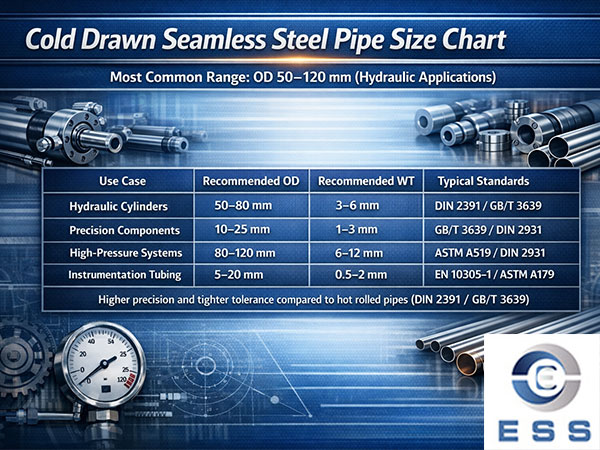
The quality standards for seamless precision
tube mainly include the following aspects:
Dimensional accuracy
The dimensional deviations of the outer
diameter, wall thickness and other dimensions of seamless precision tubes
should be strictly controlled within a small range to ensure that they can
cooperate with other components during installation and use. The following are
the relevant dimensional requirements:
1. The outer diameter tolerance adopts a
gradient control system of ±0.1mm (precision grade) to ±0.3mm (industrial grade).
2. The wall thickness deviation implements
a dual-track standard of ±5% (relative tolerance) or ±0.05mm (absolute tolerance).
3. The roundness error requirement is ≤0.8%OD, and it must reach ≤0.5%OD under
special working conditions.
4. The straightness deviation is ≤1.5mm/m, and the high-precision scene requires ≤0.5mm/m.
5. The verticality of the end face is
controlled within ±1°, and the
precision connection part requires ±0.5°.
Surface quality
The surface should be smooth, free of
defects such as cracks, folds, rolling, delamination, scarring, etc. Any
surface defects may affect the appearance quality of the pipeline as well as
its corrosion resistance and fluid flow performance during use. The following
are surface modification indicators:
1. Roughness control Ra 0.4-0.8μm (fluid pipe) to Ra≤0.2μm (ultra-high clean system).
2. Hardened layer depth 50-200μm (nitriding treatment pipe).
3. Oxide film thickness 3-7μm (anti-oxidation treatment pipe).
Chemical composition
The chemical composition of seamless
precision pipes should meet the requirements of the corresponding standards.
For example, carbon structural steel should contain a specified proportion of
carbon, manganese, silicon and other elements, while alloy structural steel
should contain specific alloy elements. The stability of the chemical
composition is crucial to ensure the mechanical properties and corrosion
resistance of the pipeline. For example, the chemical composition of carbon
steel pipe and mild
steel pipe needs to be strictly controlled. Excessive carbon content will
make the steel pipe brittle, while the addition of alloy elements can improve
the strength, toughness and other properties of the steel pipe.
Mechanical properties
Including tensile strength, yield strength,
elongation and other indicators. Good mechanical properties ensure that the
pipeline can withstand various loads without rupture or excessive deformation
during operation. The following are the relevant strength and toughness
requirements:
1. Tensile strength 410-650MPa
(conventional grade) to ≥900MPa (ultra-high strength
pipe).
2. Yield strength ratio 0.65-0.90, yield
strength ratio graded control.
3. Vickers hardness 180-320HV30, gradient
matching working condition requirements.
4. Charpy impact energy ≥27J (-20℃ working condition).
5. Fracture toughness KIC ≥60MPa·m^1/2 (pressure-bearing key parts).
6. Bending radius ≤3D
(thin-walled pipe) to ≤8D (thick-walled pipe).
Non-destructive testing
Non-destructive testing is required, such
as ultrasonic testing, eddy current testing, etc., to detect whether there are
defects such as cracks, slag inclusions, and pores inside the pipeline. The
level of flaw detection should be determined according to the use requirements
and design standards of the pipeline. It is usually required to achieve a
certain flaw detection pass rate to ensure the quality and safety of the
pipeline. In the production process of seamless
steel pipe, non-destructive testing is a key link to ensure the quality of
pipes. For high-end uses such as hydraulic
tubes and precision tubes, the flaw detection standards are particularly
strict.
Flattening test and expansion test
These two tests are used to test the
plastic deformation capacity of the pipeline and the quality of the welded
joints. The flattening test requires that the pipeline be flattened to a
specified degree under a certain pressure without breaking, and the expansion
test is to expand the end of the pipeline to a certain angle and diameter to
observe whether it has defects such as cracks. These tests can ensure that the
pipeline can adapt to various deformation conditions during use. For seamless
precision tubes used for pup joints and pipe flanges connections, flattening and expansion tests can verify their reliability and
sealing in practical applications.
Summary
The quality standard of seamless precision
tubes is a comprehensive system that covers requirements in multiple aspects
such as size, surface, chemical composition, mechanical properties and flaw
detection. Only when the corresponding standards are met in all aspects can the
quality and reliability of seamless precision tubes be guaranteed to meet the
use needs of different fields and industries.
Read more: Difference between seamless pipe and seam pipe




 Eastern Steel Manufacturing Co.,Ltd not only improve product production and sales services, but also provide additional value-added services. As long as you need, we can complete your specific needs together.
