Experimental study on the anti-thread adhesion performance of OCTG casing
Thread bonding is a common failure mode during casing service. Research shows that the material properties of casing, make-up torque, thread processing parameters and tolerances, thread surface treatment, and make-up operation all have an impact on the anti-adhesion performance of casing threads. The anti-sticking performance test of the casing thread is now carried out in order to improve the anti-thread sticking performance of the casing.

1.Test materials and methods
The equipment used in the test is the thread shackle torque test system, which consists of a test bench, a sample clamping system, a computer control and data acquisition system, a power tong, a backing tong, a torque meter, a hydraulic power station, etc. Automatic loading and unloading control under constant torque conditions, torque value at set speed within the maximum torque range, collection, recording and output of speed.
The casing specification used in the test is 139.7 mm Casing, numbered Z.
According to ISO 13679: 2002 "Test Procedure for Threaded Connections of Casing and Oil Pipes in the Oil and Gas Industry", the oil pipe at the field end should be buckled and unfastened 9 times, the casing should be buckled 2 times, and the factory end should be buckled only once. Therefore, the specific method of the test is: quantitatively detect the casing thread parameters (taper, pitch, tooth height, tight pitch, etc.) before tightening; the thread grease brand used is Bestolife®40IO®NM, and the dosage is (35+2)g . When tightening, weigh the thread grease with a balance and apply it evenly. The amount of thread grease for all samples should be kept consistent to eliminate interference factors such as excessive thread grease. Finally, the on-site end of the casing is tightened three times and unfastened twice, and the results are reviewed. Perform analysis.
2. Test results and analysis
2.1 Thread parameter detection results
Before the buckling test, the factory ends of casing X and Y have been buckled in accordance with ISO13679:2002, and only the field ends are tested three times for buckling and two buckling tests. Before tightening, check the thread parameters of casing X and Y. The test results of the external thread joint and the internal thread joint are shown in Tables 1~2.
|
Table 1 Inspection results of external thread joints
|
|
Casing number
|
Close distance/mm
|
Taper/(mm*m-1)
|
Pitch deviation①/mm
|
Tooth height deviation/mm
|
|
X
|
0.97
|
65.0
|
0
|
0.01
|
|
Y
|
-0.26
|
65.0
|
0
|
0
|
|
API Spes 5B/5CT Require
|
0.27±3.18
|
59.9~67.7
|
±0.08
|
-0.10~+0.05
|
|
Note: ① The pitch deviation is the deviation of the pitch per 25.4 mm.
|
|
Table 2 Inspection results of internal thread joints
|
|
Casing number
|
Close distance/mm
|
Taper/(mm*m-1)
|
Pitch deviation①/mm
|
Tooth height deviation/mm
|
|
X
|
11.18
|
62.0
|
0
|
0.01
|
|
Y
|
9.88
|
65.0
|
-0.01
|
0.01
|
|
API Spes 5B/5CT Require
|
11.07±3.18
|
59.9~67.7
|
±0.08
|
-0.10~+0.05
|
|
Note: ① The pitch deviation is the deviation of the pitch per 25.4 mm.
|
As can be seen from Tables 1 to 2: the close pitch, taper, pitch deviation and profile height deviation of the internal and external threaded joints of casing Specification for Processing, Measurement and Inspection of Pipe Threads.
2.2. Analysis of shackle results
Before tightening, apply thread grease. The requirements for the use of thread grease are the same as those for oil field operations. Weigh with a high-precision balance. Apply thread grease evenly to the entire engagement surface of the coupling and casing threads. It should meet the ISO 13679:2002 standard. The relevant requirements are generally based on the fact that the threads can still be clearly seen after the thread grease is applied. The upper shackle test conditions are shown in Table 3. It can be seen from Table 3 that the number of tightening of casing X and Y is 3 times. The tightening torque value of the first two tightenings is 9650 N*m, and the tightening torque value of the third tightening is 7720 N*. m.
|
Table 3 Upper shackle test conditions
|
|
Casing number
|
Number of deductions
|
Make-up torque/(N*m)
|
Buckling speed/(r*min-1)
|
Thread grease requirements
|
|
X/Y
|
1~2
|
9650
|
5~10
|
API High pressure thread grease SHEEL TYPE 3
|
|
3
|
7720
|
5~10
|
The actual buckling torque and breaking torque of casing X and Y when casing X and Y are buckled three times and buckled twice are shown in Table 4. As can be seen from Table 4: casing
The actual torque of the first and second buckling of According to ISO 13679:2002, if high torque is used, 95% or more of the maximum torque is acceptable; if low torque is used, 105% or less of the minimum torque is allowed; therefore, the actual torque value of casing X The test conditions are met; the actual torque values of the first and second buckling of casing Y are 48 N*m and 89 N*m respectively lower than the test conditions, which meets the test conditions. Because the threads of casing Y had severe thread adhesion after the second unfastening, the third tightening test was not carried out.
|
Table 4 Actual buckling torque and buckling torque when casing X and casing Y are buckled 3 times and buckled 2 times
|
|
Casing number
|
Number of deductions
|
Make-up torque/(N*m)
|
Breaking torque/(N*m)
|
|
X
|
1
|
9796
|
12706
|
|
2
|
9838
|
12423
|
|
3
|
7676
|
-
|
|
Y
|
1
|
9602
|
14908
|
|
2
|
9561
|
13189
|
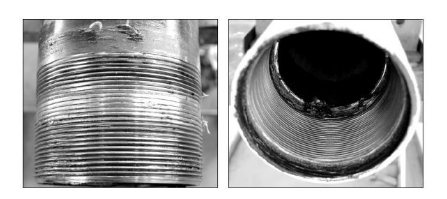
Figure 1 shows the appearance of the external thread and the internal thread after the casing Y has been buckled and unfastened twice. It can be seen that the casing enters Y
After 2 buckles and 2 buckles, thread bonding occurred from the 11th to 19th buckle on the external thread end, and thread bonding occurred on the 1st buckle on the internal thread end. This is mainly because after the casing joint is buckled, there is a high contact stress at both ends of the joint, and the contact stress at the end of the coupling is greater than that at the end of the pipe body, and the contact stress directly increases the interface friction resistance and thread bonding. Tendency is the core factor causing adhesion. The main factor causing thread bonding is not only related to the design of thread parameters, but also related to the make-up torque. The make-up torque can not only increase the contact stress on the tooth surface, but also increase the effective stress and strain distribution in the thread meshing parts, reducing the deformation resistance of the material under the action of external forces, thus causing thread bonding. It is the main external force factor causing thread bonding. .
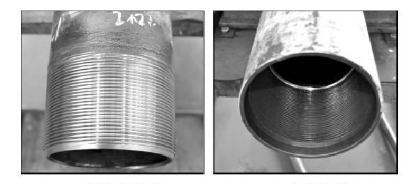
Many studies have shown that the contact stress at the end of the coupling is inseparable from the taper and tightness moment of the thread. It can be seen from Tables 1 to 2 that when the tapers are the same, the tightness moments of the external threaded joints of casing X and Y are quite different; the tightness moments and tapers of the internal threaded joints of casing X and Y are quite different. In order to further verify the effect of tight torque on the anti-adhesion performance of threads, sample Z was selected from a batch of φ139.7 mmx9.17mm casings. The internal thread parameters of casing Z are consistent with those of the internal threads of casing Y. The tightening torque of the thread is increased to 0.44 mm, and the other parameters are the same as those of the Y external thread of the casing. The top and bottom buckle test was carried out on sample Z. The results are shown in Table 5. The thread morphology of casing Z after the second unfastening is shown in Figure 2. It can be seen from Tables 4~5 and Figure 2: other parameters remain unchanged.
After the tightening torque of the external thread is increased, the actual torque values of the first and second buckling increases. Increasing the tightening torque improves the anti-sticking performance of the casing thread, and there is almost no sticking phenomenon on the thread contact surface.
|
Table 5 Top-shackle results of casing Z
|
|
Number of deductions
|
Make-up torque/(N*m)
|
Breaking torque/(N*m)
|
|
1
|
9627
|
12361
|
|
2
|
9607
|
12584
|
|
3
|
5780
|
-
|

(a) External thread morphology (b) Internal thread morphology
Figure 1 Thread morphology of casing Y after the second unfastening

(a) External thread morphology (b) Internal thread morphology
Figure 2 Thread morphology of casing Z after the second unfastening
2.3 Effect of on-site operation on thread anti-adhesion performance
A number of studies have shown that the overall accuracy of the equipment and the control of the operating process have a great impact on the anti-adhesion performance of the oil casing thread. For example, improper buckling generally causes the torque value to be too large, thereby increasing the tooth surface contact stress, resulting in Thread bonding. Therefore, on the premise of ensuring the accuracy of the equipment, the buckling quality can be improved through on-site operations.
(1)Buckle speed. After a large number of shackle tests on casing, it is concluded that when the surface temperature of the coupling exceeds 60 ℃, the thread may have
If adhesion occurs, it is recommended that the buckling speed should be less than 25 r/min.
(2) Selection of back clamp. Through multiple tests, it was found that when there are less than 6 jaws, 4 jaws are used to unscrew the oil casing. It is found that the deformation of the coupling after the test is 0.3~0.5 mm, and the thread contact stress will increase after deformation. , affecting the tightening torque and causing thread sticking. It is recommended to use 6 or more jaws to evenly clamp the coupling.
(3) The clamping position of the back clamp. When the back clamp clamps the field end and tightens the joint by hand, there will be a gap between the threads. Under the action of a large clamping force, the equivalent stress and contact stress between the threads will be larger. When the clamping position is at the factory end, the factory end machine is tightened tightly, the threads are in close contact, and the thread contact stress at the field end becomes smaller. Therefore, under the same clamping force, the clamping position should be as close to the factory end as possible. Based on a large number of shackle tests, it is concluded that the clamping position is 1/3 of the coupling length from the factory end of the coupling.
3.Conclusion
(1) When other thread parameters remain unchanged, changing the tightness torque of the external thread of the casing can not only increase the shackle torque value, but also significantly affect the anti-adhesion performance of the thread.
(2) By controlling the buckling speed, selecting the appropriate backing tong and controlling the clamping position of the backing tong, it is beneficial to improve the anti-adhesion performance of the oil and casing threads.
Read more: The causes of OCTG casing stuck or What are the grades of OCTG casing?




 Eastern Steel Manufacturing Co.,Ltd not only improve product production and sales services, but also provide additional value-added services. As long as you need, we can complete your specific needs together.
